Killing Fields is the eighteenth level in Orcs Must Die!. The Decoy is introduced here.
Stage Description[]
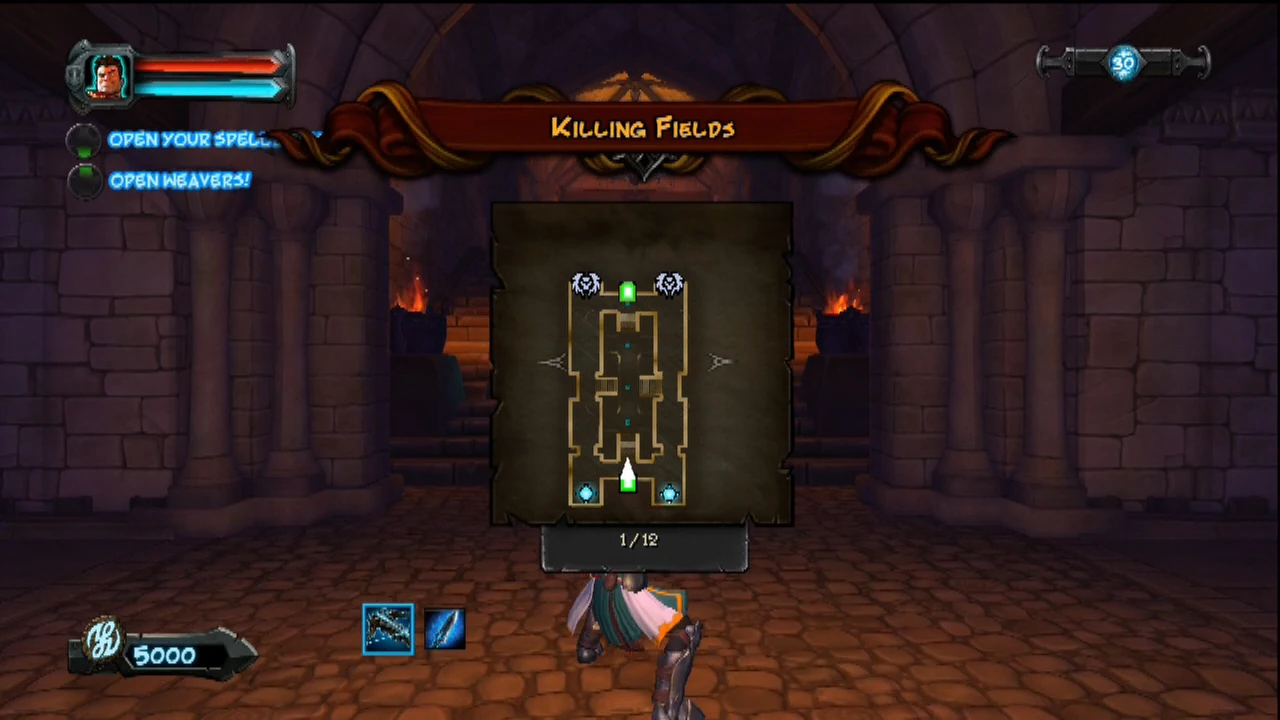
Two gates at the top of the map open up to wide hallways leading all the way down to seperate rifts. The hallways are connected through a raised passage at the center of the map; the passage accesses a series of bridges overlooking the hallways and each bridge has a boiling oil trap at their middle. A portal connects the top of the central passage to the bottom. The hallways have access points to the raised passage at their beginning, at their center and at their end near the rifts. Both hallways narrow down at the center where they connect to the center passage, then widen up past that.
Mob Waves (War Mage)[]
Enemies Encountered: Orc Warrior, Shield Orc, Crossbow Orc, Kobold Runners Kobold Sappers, Gnoll Hunter, Fire Ogre and Armored Ogre
1. Left: Orc Warriors & Shield Orcs
2. Right: Orc Warriors & Shield Orcs
3. Both: Kobold Runners, Crossbow Orcs & Orcs Warriors
Go Break
4. Both: Crossbow Orcs, Shield Orcs & Warrior Orcs, Gnoll Hunter x2
5. Both: Kobold Runners, Shield Orcs & Warrior Orcs
6. Both: Shield Orcs & Warrior Orcs, Gnoll Hunter x2
Go Break
7. Both: Kobold Runners, Shield Orcs & Warrior Orcs x2
8. Right: Crossbow Orcs, Shield Orcs & Warrior Orcs; Left: Orc Warriors & Shield Orcs, Fire Ogre
9. Both: Shield Orcs & Warrior Orcs, Gnoll Hunter x2
Go Break
10. Both: Crossbow Orcs, Shield Orcs & Warrior Orcs x2
11. Right: Kobold Runners, Shield Orcs & Warrior Orcs x2; Left: Kobold Sappers, Shield Orcs & Warrior Orcs x2
12. Right: Crossbow Orcs, Armored Ogre, Shield Orcs & Warrior Orcs, Kobold Sappers; Left: Crossbow Orcs, Armored Ogre, Gnoll Hunter, Shield Orcs & Warrior Orcs, Kobold Runners
Walkthrough (War Mage)[]
Starting Gold: 5000 coins
With Steel Weaver[]
Select Crossbow, Wind Belt, Blade Staff, Ice Amulet, Elf Archer, Brimstone, Pounder, Paladin and Decoy.
Place two archers in the middle of each of the first bridges: they'll have to be able to shoot from both sides of the bridge. Place two brimstones between the first opening of the center access, then get your Death Augmenter upgrade. You're trying to gain coins so as to obtain paladins and close off the second half of the map. You want to have two paladins at each side before buying the Guardian Armor upgrade while taking a very hands-on approach with frost novas so as to maximize your investment. Although warrior orcs love to fight with paladins, crossbow orcs will largely ignore them and head towards the rift, so be careful.
Place a decoy at the center passage so as to fool the gnoll hunters into leaving your archers alone. Freeze and smash 'em, then go back towards defending your Paladins. Keep getting Guardian upgrades while adding more archers over the bridge. Add pounders under the central access points and make that area a proper killzone between your paladins, pounders and archers. The armored ogres will require special attention but your Paladins should be able to survive a few rounds with 'em. A decoy at the center of each killzone helps tremendously.
With Elemental Weaver[]
Select Crossbow, Wind Belt, Ice Amulet, Flame Bracers, Tar Trap, Barricade, Swinging Mace, Brimstone and Decoy.
Place double barricades at the center of each hallway where it is narrowest so as to block off the center access to the middle passage: this will force the orcs into taking the long way down the hall, realize it's blocked, then come back and access the middle path where you should be waiting for them. With a swinging mace. There's a suitable spot for it somewhere past the first bridges.
You'll have to torch the orcs yourself if you want to make it under par. In addition to flame barriers at the gate, regularly use fireballs so as to quickly destroy groups of orcs. Use the coins to build a second mace and a decoy underneath it: this will hold the mob at bay. (This isn't really obvious, but you can place a decoy right into the path of your swinging mace and neither will interfere with the other at all).
As you earn more and more coins, start building a whole line of brimstones a little past underneath the bridge, for the upcoming kobold sappers. That said, kobold sappers will target your War Mage if you present a closer target: it's quite possible your decoy will suffice in bringing them at the middle passage, so if you see Kobold Sappers or even gnoll hunters, run to the center and deal with them by your maces. Keep building more and more swinging maces, with tar traps on the first lines, freezing all orcs and ogres that step onto your killzone.
Mob Waves (Nightmare)[]
Enemies Encountered: Shield Orc, Crossbow Orc, Kobold Runners Kobold Sappers, Gnoll Hunter, Fire Ogre and Armored Ogre
1. Left: Shield Orcs x2
2. Right: Shield Orcs x2
3. Both: Kobold Runners, Crossbow Orcs & Shield Orcs
4. Right: Crossbow Orcs & Shield Orcs, Kobold Sappers; Left: Crossbow Orcs & Shield Orcs, Gnoll Hunters x2
5. Both: Kobold Runners, Shield Orcs x2
6. Both: Shield Orcs, Gnoll Hunters x2, Kobold Sappers, Shield Orcs
7. Both: Kobold Runners, Shield Orcs x2
8. Right: Crossbow Orcs, Shield Orcs; Left: Crossbow Orcs, Fire Ogre, Kobold Sappers, Shield Orcs;
9. Both: Shield Orcs, Gnoll Hunter x2
10. Both: Crossbow Orcs, Shield Orcs x2
11. Right: Kobold Runners, Shield Orcs x2; Left: Kobold Sappers, Shield Orcs x2
12. Right: Crossbow Orcs, Armored Ogre, Gnoll Hunter, Shield Orcs, Kobold Sappers; Left: Crossbow Orcs, Armored Ogre, Gnoll Hunter, Shield Orcs, Kobold Runners
Walkthrough (Nightmare)[]
Starting Gold: 5000 coins Par Time: 19 minutes 30 seconds
With Steel Weaver[]
Select Crossbow, Wind Belt, Ice Amulet, Lightning Ring, Elf Archer, Brimstone, Pounder, Paladin, Decoy and Coinforge
Strapped for time, you'll have to simplify your strategy used during War Mage difficulty. As the clock ticks down, go to the left side's central access point and drop a coinforge in the 3x3 room and place two brimstones in front of the opening. Place a paladin to block the exit and two archers a square or so behind him. There's no time for fancy bridge placement and you need those archers by wave 3, so everyone will have to be on the level. This makes decoys less important than double paladins and Guardian Armor upgrades, but not any less so than the Death Augmenter upgrade (seriously, pick that out at the start).
When you do pick up Guardian Armor, you can start placing decoys at the tail end of your coinforges, with rows of Pounders leading up to them. Four Paladins do a good job of physically blocking access to the second half of the map; the archers are mostly there to help out during kobold rushes. You can put archers on the bridge when you've already secured most of the map.
With Elemental Weaver[]
Select Crossbow, Wind Belt, Ice Amulet, Lightning Ring, Elf Archer, Barricade, Swinging Mace, Brimstone, Decoy and Coinforge.
Weird pathing means that Kobold Sappers will sometimes run for you instead of your barricades, although nothing is really certain. Build your defenses as you would for War Mage difficulty: barricades blocking center access points, swinging maces under the low ceiling in the middle passage... Place a coinforge under your swinging mace and two brimstones just in front of the coinforge. Notice that your first mace must be placed in retreat by one row so as to be directly over your coinforge.
I've decided to place elf archers on the bridge to help take out Kobold Sappers, with decoys blocking their way. Make sure to keep decoys far enough from the main mob's path and build another decoy underneath your swinging maces; you'll want a few lightning storms to help control the orc population. Despite all that you can still encounter kobold sappers wrecking your barricades: rush out whenever you hear a warning on your minimap and take care of the situation yourself. Money shouldn't be a concern on this map. You'll probably want to take out most of the mob yourself if you want to finish this map under par, resorting to your killzone as a tool for clean-up.
With Knowledge Weaver[]
Select Crossbow, Wind Belt, Ice Amulet, Lightning Ring, Elf Archer, Autoballista, Brimstone, Pounder, Decoy and Coinforge.
You'll be fighting the orcs from all the way down the map, by the second set of bridges. First, take your Spell Magnification upgrade and greet the tide of orcs with double brimstones and a coinforge by the center access point. Use the money to place archers on the second bridge, you'll have time for that. With a decoy between the two set of archers at the middle passage so as to fool Gnoll Hunters, you'll have your business trying to contain the two streams of orcs: place decoy traps (and a coinforge) underneath the second set of boiling oil traps, with a pounder in the center. Don't hesitate to take the Fleet of Foot upgrade and kill most of the orcs yourself with lightning storms and chain lightning. Add more double brimstones between the exit of your central access point. Place your remaining money on autoballistas besides your pounder and more archers. Keep replacing decoys and add more pounders over the coinforge of the central access point. The Rift Sentience upgrade will also help in taking a load off.
Achievements[]
| Keepmaster Complete Act 2 |
| Overview of levels in Orcs Must Die! | |
|---|---|
| Act 1 | The Hallway • The Fork • The Corner • The Baths • Runner's Alley • Overpass • Twin Halls • Lunch Break • The Stream • Sludge Hole |
| Act 2 | Chaos Chamber • Chokepoint • The Arena • The Balcony • The Tower • The Library • The Bridge • Killing Fields |
| Act 3 | Rebirth • Gateway • Hard Climb • The Squeeze • Stairs of Doom • Finale |
| Lost Adventures | Double Trouble • Reverse Tower • The Pit • Triple Down • Great Gorge |